E90Post


BMW 3-Series (E90 E92) Forum > E90 / E92 / E93 3-series Technical Forums > Cosmetic and Lighting Modifications (exterior/interior) > Can you remove projectors? LCI


Reply
 
Thread Tools Search this Thread
      04-01-2017, 01:29 PM   #1
Andy198712
Major
145
Rep
1,011
Posts

Drives: 2010 E91 325d
Join Date: Mar 2017
Location: Cornwall

iTrader: (0)

Can you remove projectors? LCI

Hello.

i have a problem with my LCI E91, i have Xenon headlights and AHL.
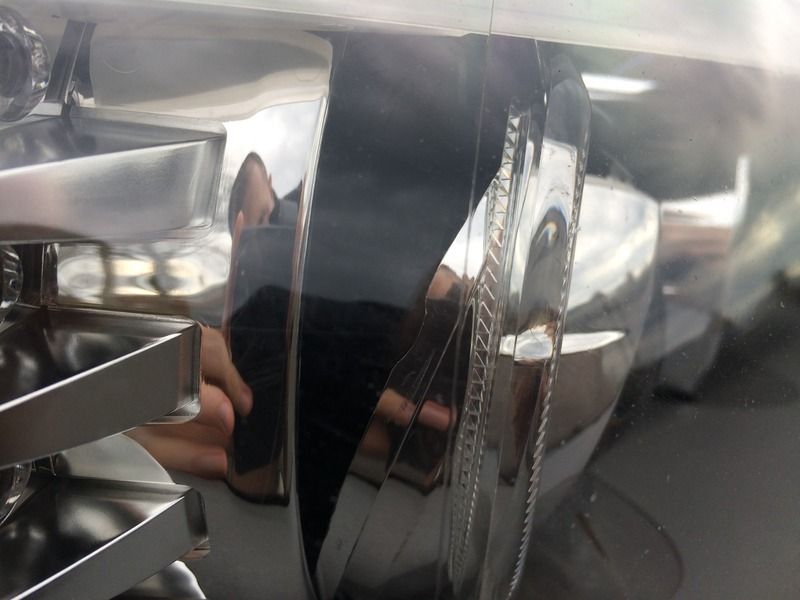
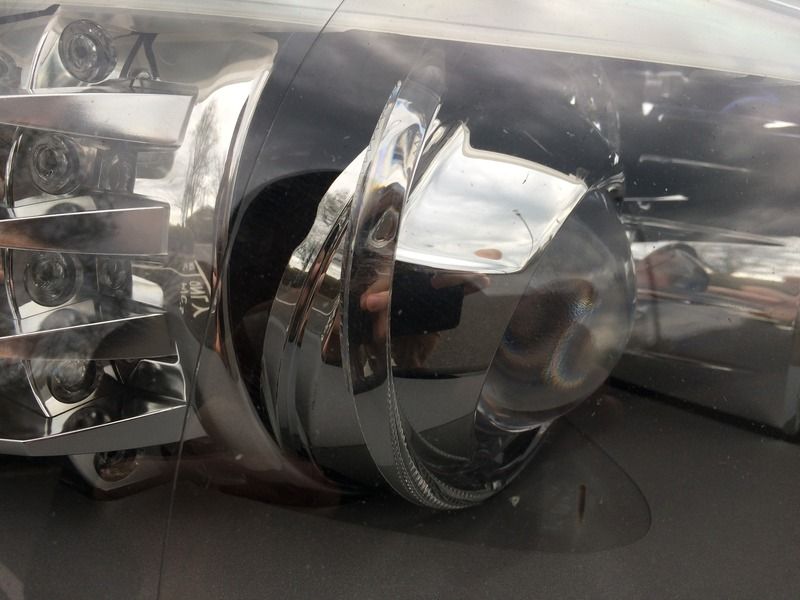
one of my lenses on the drivers side and the silver shroud has come un clipped (leaving the shroud and sense to do what ever they please).

i'm wondering if i can ovoid removing the front of the light by removing the headlight, and removing the projector from the rear, then fiddling around and re clipping the sense/shroud assembly. if that makes sense?

or can you just remove the bulb leaving a very small hole to reach through...?

i'm searching high and low for a good picture of one removed, but i've only found people with wobbly xenons who have tightened some screws and it fixed it, i'm wondering if un doing these screws will let me remove the projector unit?

Cheers

Andy

pics
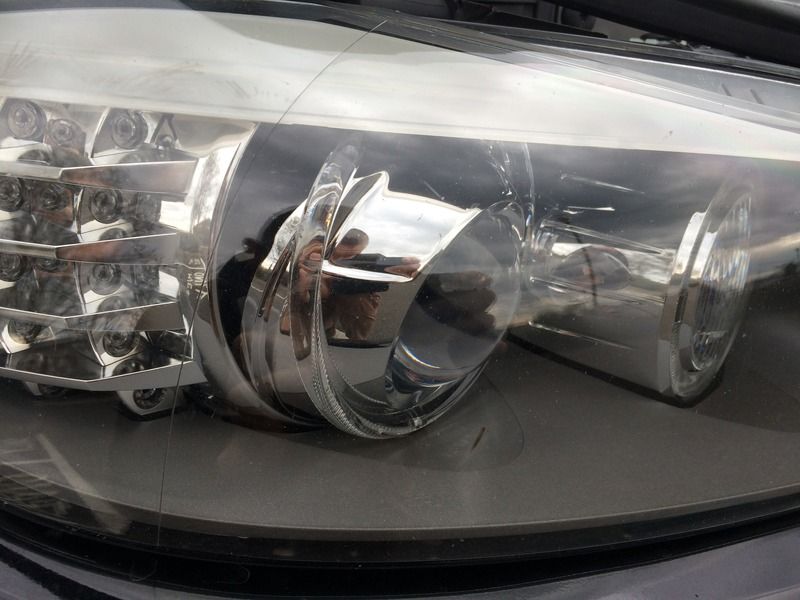


Looking in the crack i can see the clip that has come off the main assembly... looks like it just wants clipping back on, bulb is still fine and moves on the adjuster screw and on start up.
a job that would be very easy if you could easily remove the headlight sense!!
Appreciate 0
      04-01-2017, 01:41 PM   #2
matteblue3er
Captain
238
Rep
947
Posts

Drives: Racecar
Join Date: Jul 2015
Location: Philly

iTrader: (0)

No you need to remove the lens to fix that. You're better off buying a used housing off eBay or taking advantage of having the lens off and mod them.
Appreciate 0
      04-02-2017, 08:16 AM   #3
Andy198712
Major
145
Rep
1,011
Posts

Drives: 2010 E91 325d
Join Date: Mar 2017
Location: Cornwall

iTrader: (0)

used sets don't seem to be on eBay at the moment in the UK, well, not drivers side! or single. and the odd pair on there are over a grand GBP....

thinking i'll cut the ouster lip off then pry around and get them off. haven't got much to loose!
Appreciate 0
      04-02-2017, 09:08 AM   #4
Andy198712
Major
145
Rep
1,011
Posts

Drives: 2010 E91 325d
Join Date: Mar 2017
Location: Cornwall

iTrader: (0)

This picture fills me with hope a little...

https://www.ebay.co.uk/itm/252800700892

Basic plan will be prep to pull the lense, if I can get away with out doing. Bonus.
Appreciate 0
      04-02-2017, 09:25 AM   #5
mad1stgen
Master Wagon Builder
mad1stgen's Avatar
409
Rep
877
Posts

Drives: 2015 F wagon S55/6MT
Join Date: Apr 2014
Location: Metro Detroit/Tampa Bay

iTrader: (57)

Quote:
Originally Posted by Andy198712 View Post
This picture fills me with hope a little...

https://www.ebay.co.uk/itm/252800700892

Basic plan will be prep to pull the lense, if I can get away with out doing. Bonus.
Since your shroud is loose, the projector can be removed from the assembly without taking the lense off. But that's the problem. The shroud clips onto the projector, so it's very difficult to clip it back on once you start reassembling things. Even more so, one or both clips on the shroud are probably broken off, which is why it's sitting slanted like that. You'll need a new shroud, and a ton of patience to make it work. I've done it with pull strings tied to the shroud, but it's still a PITA.
Appreciate 0
      04-02-2017, 05:28 PM   #6
Andy198712
Major
145
Rep
1,011
Posts

Drives: 2010 E91 325d
Join Date: Mar 2017
Location: Cornwall

iTrader: (0)

So the shroud won't fit out the same hole as the projector?
I guess you need to fit the projector, then shroud from the front, then lense?

Cheers for the input guys, saves me a lot of time.
I how many clips are there does anyone know? I can see the outer one is intact, and will have a look for the inner. I may get lucky u never know!
How it came off I don't know! If they are intact it'll be getting glued or lock wired to ensure it won't happen again!

Thanks again
Appreciate 0
      04-02-2017, 05:30 PM   #7
Andy198712
Major
145
Rep
1,011
Posts

Drives: 2010 E91 325d
Join Date: Mar 2017
Location: Cornwall

iTrader: (0)

Oh and the glass protector eye is free moving too, how does that fix on? When I've googled pictures it seem to be fixed to the projector assy
Appreciate 0
      04-03-2017, 07:46 AM   #8
mad1stgen
Master Wagon Builder
mad1stgen's Avatar
409
Rep
877
Posts

Drives: 2015 F wagon S55/6MT
Join Date: Apr 2014
Location: Metro Detroit/Tampa Bay

iTrader: (57)

Quote:
Originally Posted by Andy198712 View Post
So the shroud won't fit out the same hole as the projector?
I guess you need to fit the projector, then shroud from the front, then lense?

Cheers for the input guys, saves me a lot of time.
I how many clips are there does anyone know? I can see the outer one is intact, and will have a look for the inner. I may get lucky u never know!
How it came off I don't know! If they are intact it'll be getting glued or lock wired to ensure it won't happen again!

Thanks again
No, you can remove the projector, and the shroud from the back without touching the lense, especially if the shroud is already unclipped from the projector. The reassembly is where is problematic.

There are two clips (at 9 and 3 o'clock) on the shroud.

Quote:
Originally Posted by Andy198712 View Post
Oh and the glass protector eye is free moving too, how does that fix on? When I've googled pictures it seem to be fixed to the projector assy
If you have a loose projector glass, you have bigger issues

Time to pull the light and have a look.
Appreciate 0
      04-03-2017, 01:58 PM   #9
Andy198712
Major
145
Rep
1,011
Posts

Drives: 2010 E91 325d
Join Date: Mar 2017
Location: Cornwall

iTrader: (0)

Yeah pretty sure the glass is loose, will double check that.
Okay, just need to get it off the car and have a look! Hopefully next week when I'm off!
Thanks for the input, I'll post up what I find.

I can see the 9 o clock tab will look for the 3
Appreciate 0
      04-04-2017, 03:26 AM   #10
Rocko123
Private First Class
Rocko123's Avatar
70
Rep
125
Posts

Drives: 330xi
Join Date: Dec 2012
Location: NJ

iTrader: (1)

Quote:
Originally Posted by Andy198712 View Post
Yeah pretty sure the glass is loose, will double check that.
Okay, just need to get it off the car and have a look! Hopefully next week when I'm off!
Thanks for the input, I'll post up what I find.

I can see the 9 o clock tab will look for the 3
Man all Im going to say is that opening those lights will most def test your patience. I've done it several times and its just not enjoyable lol also dont touch the chrome cause it rubs off very easily its like a chrome powder, and to unclip the piece of the shroud thats broken on yours you have to either use your finger or stick something from inside like Mad said theyre at 9/3 o clock. Also careful when taking it apart and the angel eye tubes, those are kind of fragile too. Good luck man
__________________
IG: RockoOmazing
Youtube.com/RockoOmazing

Appreciate 0
      04-04-2017, 09:33 AM   #11
anjuna
First Lieutenant
United_States
307
Rep
394
Posts

Drives: f25
Join Date: Feb 2017
Location: houston

iTrader: (0)

1. remove headlight.
2. heat in oven to release soften the sealing glue between the front lense and the headlight proper.
3. GENTLY pry with a wide flat head screwdriver in an area that does not show on the outside of the car. You will mark it up and fudge it up, but the main idea is to begin to seperate the lense from the housing. I suggest having a heat gun or hair dryer to assist you in this. The whole thing will be pretty hot and getting hot glue on your skin sucks, so try wearing some sort of heat resistant gloves.
4. remove the lense by prying gently all around. It's easy to break, but just take your time. I don't know how much you make a hour, but if it takes you a hour to remove the lense, you've effectively saved yourself 3 figures of money.
5. remove the shroud/bezel
6. projector screws are probably loose. remove them and apply blue loctite to them and screw back in. This holds the front (lense) and rear (mounting housing) of the projector together.
7. fix the bezel back on. If any tabs are broken, I suggest some sort of cyanoacrylate or hot glue. Your choice here.
8. Reassemble with heat. going back together will be much easier, just try to clamp or load the lense against the housing to make sure it's sealed properly. some people buy new rubber when doing this, but I've never had a problem doing it without additional stuff.
Appreciate 0
      04-04-2017, 01:12 PM   #12
Andy198712
Major
145
Rep
1,011
Posts

Drives: 2010 E91 325d
Join Date: Mar 2017
Location: Cornwall

iTrader: (0)

Quote:
Originally Posted by Rocko123 View Post
Man all Im going to say is that opening those lights will most def test your patience. I've done it several times and its just not enjoyable lol also dont touch the chrome cause it rubs off very easily its like a chrome powder, and to unclip the piece of the shroud thats broken on yours you have to either use your finger or stick something from inside like Mad said theyre at 9/3 o clock. Also careful when taking it apart and the angel eye tubes, those are kind of fragile too. Good luck man
Yeah I'm mentally prepared
I can see 85% of the far clip and it looks intact! So could be okay. Im tempted to add some hot glue or locking wire to stop it happening again.
I'll wear gloves to help with finger prints and oils removing any chrome

Cheers
Appreciate 0
      04-04-2017, 01:16 PM   #13
Andy198712
Major
145
Rep
1,011
Posts

Drives: 2010 E91 325d
Join Date: Mar 2017
Location: Cornwall

iTrader: (0)

Quote:
Originally Posted by anjuna View Post
1. remove headlight.
2. heat in oven to release soften the sealing glue between the front lense and the headlight proper.
3. GENTLY pry with a wide flat head screwdriver in an area that does not show on the outside of the car. You will mark it up and fudge it up, but the main idea is to begin to seperate the lense from the housing. I suggest having a heat gun or hair dryer to assist you in this. The whole thing will be pretty hot and getting hot glue on your skin sucks, so try wearing some sort of heat resistant gloves.
4. remove the lense by prying gently all around. It's easy to break, but just take your time. I don't know how much you make a hour, but if it takes you a hour to remove the lense, you've effectively saved yourself 3 figures of money.
5. remove the shroud/bezel
6. projector screws are probably loose. remove them and apply blue loctite to them and screw back in. This holds the front (lense) and rear (mounting housing) of the projector together.
7. fix the bezel back on. If any tabs are broken, I suggest some sort of cyanoacrylate or hot glue. Your choice here.
8. Reassemble with heat. going back together will be much easier, just try to clamp or load the lense against the housing to make sure it's sealed properly. some people buy new rubber when doing this, but I've never had a problem doing it without additional stuff.

Cheer
I'd read heat doesn't do much for LCI lights? I'm tempted strongly to cut away the outer lip the. Pry out the lense, could look neater in the long run? Seen a how to.
I'm pretty worried the lense will crack, but guess the heat helps with that?
Also tempted to cut the lense off with a very thin neat cut. We'll see!
How is the glass bezel fixed in?

Thanks, not rushing into it deffinatly makes me feel better about it all!
If it is ready for scrap or I break it ect, at least I tried!
Appreciate 0
      04-04-2017, 01:17 PM   #14
Andy198712
Major
145
Rep
1,011
Posts

Drives: 2010 E91 325d
Join Date: Mar 2017
Location: Cornwall

iTrader: (0)

Oh and remove bulbs and un clip the angel eye first right?
Appreciate 0
      04-04-2017, 01:19 PM   #15
Rocko123
Private First Class
Rocko123's Avatar
70
Rep
125
Posts

Drives: 330xi
Join Date: Dec 2012
Location: NJ

iTrader: (1)

Quote:
Originally Posted by Andy198712 View Post
Quote:
Originally Posted by Rocko123 View Post
Man all Im going to say is that opening those lights will most def test your patience. I've done it several times and its just not enjoyable lol also dont touch the chrome cause it rubs off very easily its like a chrome powder, and to unclip the piece of the shroud thats broken on yours you have to either use your finger or stick something from inside like Mad said theyre at 9/3 o clock. Also careful when taking it apart and the angel eye tubes, those are kind of fragile too. Good luck man
Yeah I'm mentally prepared
I can see 85% of the far clip and it looks intact! So could be okay. Im tempted to add some hot glue or locking wire to stop it happening again.
I'll wear gloves to help with finger prints and oils removing any chrome

Cheers
Also the oven method didn't work well for me, my car is an 06 and the glue isn't as soft as the e92's which the oven method works great for, i ended up just heat gunning the whole job working in areas about 2 inches at a time but you might want to go all around it at first so the plastic housing flexes instead of cracking but the glue itself stays hard .. and another thing is in my case the leveling assembly that makes the light go up or down was broken so what I did was leveled it in front of my garage and just J.B.welded it in place. Good luck man
__________________
IG: RockoOmazing
Youtube.com/RockoOmazing

Appreciate 0
      04-04-2017, 01:26 PM   #16
Rocko123
Private First Class
Rocko123's Avatar
70
Rep
125
Posts

Drives: 330xi
Join Date: Dec 2012
Location: NJ

iTrader: (1)

Quote:
Originally Posted by Andy198712 View Post
Quote:
Originally Posted by anjuna View Post
1. remove headlight.
2. heat in oven to release soften the sealing glue between the front lense and the headlight proper.
3. GENTLY pry with a wide flat head screwdriver in an area that does not show on the outside of the car. You will mark it up and fudge it up, but the main idea is to begin to seperate the lense from the housing. I suggest having a heat gun or hair dryer to assist you in this. The whole thing will be pretty hot and getting hot glue on your skin sucks, so try wearing some sort of heat resistant gloves.
4. remove the lense by prying gently all around. It's easy to break, but just take your time. I don't know how much you make a hour, but if it takes you a hour to remove the lense, you've effectively saved yourself 3 figures of money.
5. remove the shroud/bezel
6. projector screws are probably loose. remove them and apply blue loctite to them and screw back in. This holds the front (lense) and rear (mounting housing) of the projector together.
7. fix the bezel back on. If any tabs are broken, I suggest some sort of cyanoacrylate or hot glue. Your choice here.
8. Reassemble with heat. going back together will be much easier, just try to clamp or load the lense against the housing to make sure it's sealed properly. some people buy new rubber when doing this, but I've never had a problem doing it without additional stuff.

Cheer
I'd read heat doesn't do much for LCI lights? I'm tempted strongly to cut away the outer lip the. Pry out the lense, could look neater in the long run? Seen a how to.
I'm pretty worried the lense will crack, but guess the heat helps with that?
Also tempted to cut the lense off with a very thin neat cut. We'll see!
How is the glass bezel fixed in?

Thanks, not rushing into it deffinatly makes me feel better about it all!
If it is ready for scrap or I break it ect, at least I tried!
I personally havent tried the cutting the outer lip method but i can most def see how that would work better just make sure when you put it back together the adhesive you use which is Butyl Tape is adhered well and a perfect seal because of moisture. Yes separate the angel eyes VERY carefully cause they're easy to break specially after spending hours patiently and tediously trying to disassemble. The plastic lens is actually pretty durable so long as you don't obviously bend it in too much but its just enough to pry and pull on shouldn't crack that easy specially if you cut the outer lip on the housing.
__________________
IG: RockoOmazing
Youtube.com/RockoOmazing

Appreciate 0
      04-04-2017, 02:20 PM   #17
Andy198712
Major
145
Rep
1,011
Posts

Drives: 2010 E91 325d
Join Date: Mar 2017
Location: Cornwall

iTrader: (0)

Quote:
Originally Posted by Rocko123 View Post
Also the oven method didn't work well for me, my car is an 06 and the glue isn't as soft as the e92's which the oven method works great for, i ended up just heat gunning the whole job working in areas about 2 inches at a time but you might want to go all around it at first so the plastic housing flexes instead of cracking but the glue itself stays hard .. and another thing is in my case the leveling assembly that makes the light go up or down was broken so what I did was leveled it in front of my garage and just J.B.welded it in place. Good luck man
On the plus side the light still moves on start up so thinking that's still working (famous last words)
Appreciate 0
      04-04-2017, 02:24 PM   #18
Andy198712
Major
145
Rep
1,011
Posts

Drives: 2010 E91 325d
Join Date: Mar 2017
Location: Cornwall

iTrader: (0)

Quote:
Originally Posted by Rocko123 View Post
I personally havent tried the cutting the outer lip method but i can most def see how that would work better just make sure when you put it back together the adhesive you use which is Butyl Tape is adhered well and a perfect seal because of moisture. Yes separate the angel eyes VERY carefully cause they're easy to break specially after spending hours patiently and tediously trying to disassemble. The plastic lens is actually pretty durable so long as you don't obviously bend it in too much but its just enough to pry and pull on shouldn't crack that easy specially if you cut the outer lip on the housing.
See I was thinking I'd remove all the old glue, and I've ordered some black high temp silicone to seal it back after, easier in the future then too.....

For the angel eyes, do you remove the bulb for them and unclip them there? That seemed the place on a how to I read.....?
I'm thinking of finding a hooked tool like a de burring tool to slide under and a long to break the seal maybe... can try lots of things.

The help is great thanks!
Appreciate 0
      04-04-2017, 02:44 PM   #19
Rocko123
Private First Class
Rocko123's Avatar
70
Rep
125
Posts

Drives: 330xi
Join Date: Dec 2012
Location: NJ

iTrader: (1)

Quote:
Originally Posted by Andy198712 View Post
Quote:
Originally Posted by Rocko123 View Post
I personally havent tried the cutting the outer lip method but i can most def see how that would work better just make sure when you put it back together the adhesive you use which is Butyl Tape is adhered well and a perfect seal because of moisture. Yes separate the angel eyes VERY carefully cause they're easy to break specially after spending hours patiently and tediously trying to disassemble. The plastic lens is actually pretty durable so long as you don't obviously bend it in too much but its just enough to pry and pull on shouldn't crack that easy specially if you cut the outer lip on the housing.
See I was thinking I'd remove all the old glue, and I've ordered some black high temp silicone to seal it back after, easier in the future then too.....

For the angel eyes, do you remove the bulb for them and unclip them there? That seemed the place on a how to I read.....?
I'm thinking of finding a hooked tool like a de burring tool to slide under and a long to break the seal maybe... can try lots of things.

The help is great thanks!
Ideally yes to remove the old glue and seal it with that would be easy and simple but removing the the glue is a mission. My first time i used a flathead to break the seal but its just difficult to open it up in one shot lol also not sure about your angel eyes since my lights were prelci so the angel eyes were held in with small screws on the top of the housing onto a small black plastic piece thats attached to the lens. Just look into the housing you should be able to see how theyre held in
__________________
IG: RockoOmazing
Youtube.com/RockoOmazing

Appreciate 0
      04-04-2017, 04:07 PM   #20
Andy198712
Major
145
Rep
1,011
Posts

Drives: 2010 E91 325d
Join Date: Mar 2017
Location: Cornwall

iTrader: (0)

Cool thanks good to go prepared!
Appreciate 0
      04-04-2017, 04:19 PM   #21
Rocko123
Private First Class
Rocko123's Avatar
70
Rep
125
Posts

Drives: 330xi
Join Date: Dec 2012
Location: NJ

iTrader: (1)

Quote:
Originally Posted by Andy198712 View Post
Cool thanks good to go prepared!
Here ill give you some moral support im doing it now
Attached Images
  
__________________
IG: RockoOmazing
Youtube.com/RockoOmazing

Appreciate 1
      04-04-2017, 05:09 PM   #22
Rocko123
Private First Class
Rocko123's Avatar
70
Rep
125
Posts

Drives: 330xi
Join Date: Dec 2012
Location: NJ

iTrader: (1)

Quote:
Originally Posted by Rocko123 View Post
Quote:
Originally Posted by Andy198712 View Post
Cool thanks good to go prepared!
Here ill give you some moral support im doing it now
Here are some more pictures to help you get through the process
Attached Images
     
__________________
IG: RockoOmazing
Youtube.com/RockoOmazing

Appreciate 1
Reply

Bookmarks


Posting Rules
You may not post new threads
You may not post replies
You may not post attachments
You may not edit your posts

BB code is On
Smilies are On
[IMG] code is On
HTML code is Off


All times are GMT -5. The time now is 03:41 AM.


e90post
Powered by vBulletin® Version 3.8.11
Copyright ©2000 - 2024, vBulletin Solutions Inc.
1Addicts.com, BIMMERPOST.com, E90Post.com, F30Post.com, M3Post.com, ZPost.com, 5Post.com, 6Post.com, 7Post.com, XBimmers.com logo and trademark are properties of BIMMERPOST