

|
|
|
|
 |
|
 |
BMW Garage | BMW Meets | Register | Today's Posts | Search |
 |

|
BMW 3-Series (E90 E92) Forum
>
The Junkyard N54 Engine: Rebuild and Refresh
|
 |
| 07-27-2016, 12:45 PM | #1 |
|
Captain
 581
Rep 673
Posts |
The Junkyard N54 Engine: Rebuild and Refresh
N54 Community,
Most of my updates are posted in my build log but I figured this was interesting enough and deserved it's own thread. My E61 Build Thread: http://www.e90post.com/forums/showthread.php?t=1224707 I also hope this is motivational for those debating whether to pull the trigger on a big project like an engine swap, trans swap, whatever. Go for it! BMW forums are filled with people advising others to "sell your car and just buy a manual one," where the reality is these "advisors" have never done the swap or have any first hand experience with the intricacies of the project, it seems their advice is driven by fear of the unknown. Furthermore, the sense of accomplishment with tackling projects yourself is worth it all by itself, not to mention the knowledge gained or the money saved on labor. *steps off soapbox* So it has been about 4 months since I blew my motor: http://www.e90post.com/forums/showth...1239066&page=2 Prior to my engine exploding I was collecting parts for my AT-MT conversion as well as an AWD-RWD conversion with all M5 components. A blown motor is never convenient but the timing worked out well as I was in a position where I could undertake all projects at once which has certain advantages. My wrenching skills and understanding of the E6X/N54 platforms have been developing and although all of these relatively major projects were beyond the scope of work I had previously done, I felt I could pull it off with ample due-diligence and patience. I mean it's all nuts and bolts right? I don't have plans to take the HP/TQ much past what it was previously (~550-600whp) for my intended use as a daily-driven weapon, that power is ample and it think it is a good range where the stock internal N54 can manage the load/stress. It seems >600whp is where wear and tear are really amplified. My goal was to find a N54 long block with low-moderate (<75,000) miles on it, $2,000 or less was the price I was hunting for. Many people sarcastically wished me luck or simply said that it was not possible; I am a competitive person by nature so this feedback only fueled my interest in succeeding ....so thanks! As all the naysayers would have it, most of the engines that met my criteria were in the $3,000-$4,000 range. The best deal I had found after a month or so of casual searching was a 535xi engine w/76k and a 6 month part warranty for $2,650 shipped from Canada (shipping was $230 or so). Not a bad deal but I passed. I ended up finding an ad on Craigslist for an N54 engine out in Fontana for $800, no picture or additional information listed but after contacting the seller they confirmed with was an N54 from a 2011 335is and had 35k on it. I went immediately to view the engine in person. The engine was complete minus the turbos and had been in an accident where the car was totaled, there was some damage to the exterior components, oil pan, and valve cover. As it was, $800 was still a great deal and if the engine was a flop I could likely part it out and break even financially. Oddly enough the CL ad was posted for over 3 months, there had been multiple buyers but all of them were scared off by the damage. I bought the engine for $800, paid $100 for it to be shipped to my house later that day, and tipped the high schooler who delivered it $40. So $940 shipped to my garage, not bad. After the initial tear down I sold the oil filter housing, wiring harness, HPFP, and i12 injectors for $950 so I know had a free N54 engine. My main concern was the block and head which after examining the damage inflicted to the engine from the crash, should still be good, I confirmed this with some "good enough" leak down tests and continued ordering parts to rebuild the front side of the engine: timing chain, cogs, oil and vacuum pump drive system, etc. All of the other engine components would be transferred over from my blown motor. Rebuild Parts List Chains, sprockets, gears: $170 Oil pan gasket, hardware: $85 Used "eBay 535i oil pan: $220 TOTAL: $475 Since the engine is still out of the wagon and it has not yet been started, ran, or tuned to confirm function, WE WILL SEE if this all plays out or if the joke's on me (naysayers patiently waiting). As it stands now, $465 for an N54 with <35k on it is a deal I am very happy with. On to the pics! Evan Replacement engine home for the first time:     Stripping down the engine. Most components were damaged but some were not.  A better look at the damage on the bottom.  You cans ee the stress cracks in the cog and also the impact marks on the chain and chain guide.  Valve cover damage  Thankfully it was only superficial to the cover  There was some mild contamination inside the engine from the holes in the oil pan + sitting in a junkyard for a few months  The rest of the engine looked great internally  Peaking up a cylinder  Engine stripped down and exterior cleaned    There was a broken oil pan bolt which needed to be rescued    The as-is leak down test yielded terrible results so I oiled up the cylinder walls and retested. There were some variation with the reading on 2 cylinders but they had audible intake valve leak (inconsistent) and since I can't fire up the engine to get it up to operating temp, possibly clean gunk, and improve valve seat, the numbers were "good enough" for me to continue with the rebuild. 1% 12% 8% 4% 6% 12%    Next up was cleaning the valves 1  2  3  4  5  6  Annie the dog is not amused  New oil pan arrived, it is in much better condition than the others  Tech Tip: A used subframe bolt works well as a counterhold in the Harbor Freight engine stand. I would still recommend a proper hub counterhold but this certainly helps.  Didn't have the proper tool to remove this vacuum pump gear access plug from the front and on my old engine I was able to pop it out from the inside (working by the oil pump) with a long pry bar. Knowing I had an extra one to use, this one got the dremel.  Got it!  Camshaft lock installed  Chainguide mounting plugs removed  Timing chain tensioner removed, make sure to pump it a few times to evacuate old oil and also replace the aluminum seal.  Hub counter hold and breaker bar with 22mm socket  Teamwork  Interesting build up, my 535xi engine with 105k didn't have anything like this   Vanos sensors removed and cleaned  Removing Vanos units  Vanos, timing chain, and chain guide removed  Vanos cleaned  Vacuum and oil pump drive system removed  Closer at the oil pump drive damage  Bent cog vs new  Chain guide damage from chain tension  An oversight on my part but there are subtle differences between some N54 hubs and sprockets 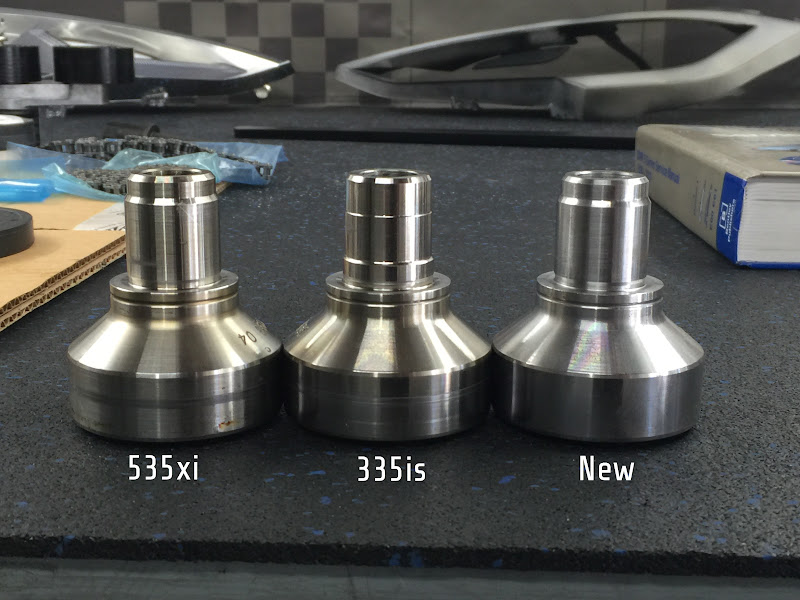 535xi cog left, 335is right, the friction/spacer design is also different but most importantly the 335is cogs I ordered would not fit on the 535xi style hub I bought so I ended up running the original 335is hub with new cogs.   Workspace  N54 guts  With frontside components removed I cleaned the engine as much as I could with rags and compressed air  Much better now  I used my old lower chain guide as it didn't have any damage and installed all new drive components  Oil pump in. I reused the 335is pump as it had no noticeable damage and had 1/3 the mileage of my 535xi unit.  Drive system in  Timing chain and vanos back in 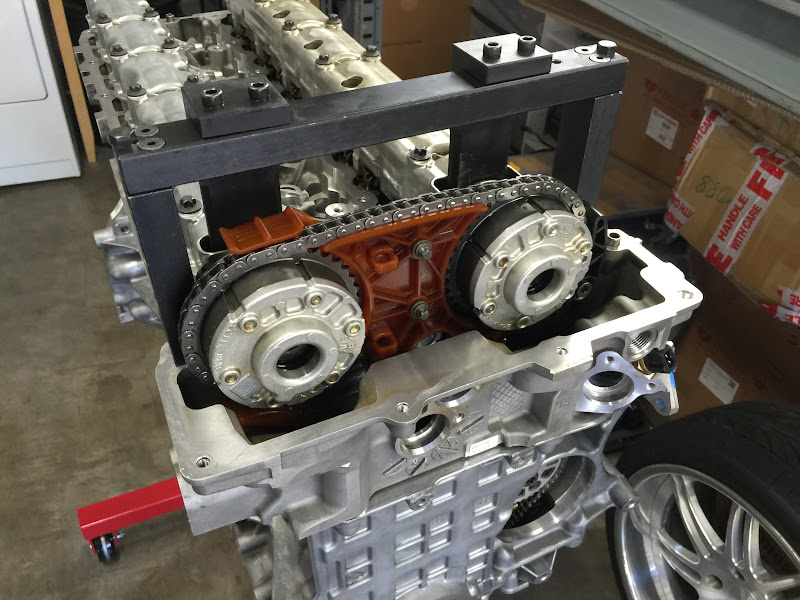 Camshaft sensors and timing tool installed  Crank hub in  Timing chain pre-tensioned  Torqued to spec (torque + 180)  Oil pump, pickup, and baffle installed and torqued  Oil pan gasket  Oil pan installed and torqued  Inspected and cleaned all pulleys. They collect little mounds of dirt over time so removing that should lighten the pulleys and improve performance right? +5hp?  Before/After  Installed  Belt tensioner installed  Had a roque/stripped manifold stud to remove  #Tools Hard to reach places and specifc torque angles + low load specs   Valve cover on  Let's see how well I organized my oem nuts and bolts...  Alternator and compressor installed  Oil filter housing service. I had a set of new gaskets sitting for over year so this was an IDEAL time to install them, lol. New filter and the BMS bypass valve  Gotta love machined metal  My low mileage i12 injectors cleaned and installed   New set of NGKs needed to be gapped.  I have 2 different gap tools and they both suck, this is by far the best way I have found to lower the gap.  Delphi coils and plugs installed  HPFP, fuel rail, and engine mount installed 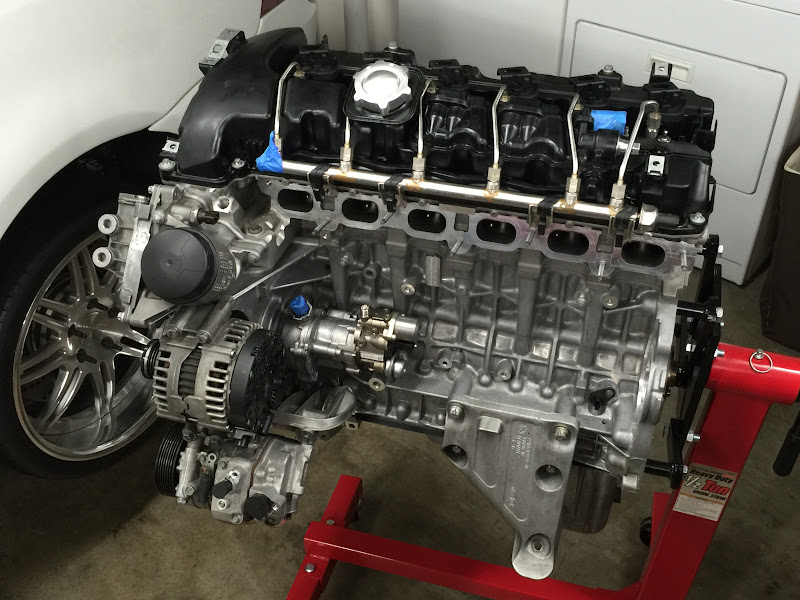 Starting to look like a normal N54  |
|
Appreciate
14
|
| 07-27-2016, 02:01 PM | #4 | ||
|
Captain
581
Rep 673
Posts |
Quote:
So this week or next hopefully! Quote:
Evan |
||
|
Appreciate
0
|
| 07-27-2016, 03:03 PM | #7 |
|
Clean is the new cool, keep it that way.
808
Rep 1,685
Posts |
Nice work man.
__________________
2011 335i, FBO, N55+ Turbo, full E85, S55 intercooler, etc.
2015 X5 35i Xdrive |
|
Appreciate
0
|
| 07-27-2016, 03:19 PM | #8 | |
|
Clean is the new cool, keep it that way.
808
Rep 1,685
Posts |
Quote:
The fact that this feature is enabled is so annoying. I admin on a couple of forums and it is always disabled. The suggestion and feedback section of this forum is useless.
__________________
2011 335i, FBO, N55+ Turbo, full E85, S55 intercooler, etc.
2015 X5 35i Xdrive |
|
| 07-27-2016, 06:31 PM | #11 |
|
Captain
75
Rep 630
Posts
Drives: '09 335 E93 6MT
Join Date: Mar 2011
Location: Socal
|
I love photo teardown threads like these. Thanks for sharing!
__________________
Convertible | Manual
 | M-Sport | MHD Stage 1 + FMIC | 335is Clutch | ER CP | RB Inlets | VRSF 5" Stepped FMIC | M3 F/R Control Arms | KW V3 | Hawk HPS Pads | Stoptech Slotted Rotors | Blackvue DR650-2CH Dash Cam | LCI Taillights | M-Sport | MHD Stage 1 + FMIC | 335is Clutch | ER CP | RB Inlets | VRSF 5" Stepped FMIC | M3 F/R Control Arms | KW V3 | Hawk HPS Pads | Stoptech Slotted Rotors | Blackvue DR650-2CH Dash Cam | LCI Taillights |
|
Appreciate
0
|
| 07-27-2016, 06:31 PM | #12 |
|
Lieutenant
163
Rep 466
Posts |
good work. I'm glad your doing the work all your self and documenting it on the forum. The bmw community really need more people like us. I come from the honda/evo world and work like this is pretty normal. I really wondered by bmw owners were always so scared to work on their own cars.
__________________
2007 e90 335i
pure stage 2 DD turbos, rb inlets |
|
Appreciate
0
|
| 07-27-2016, 06:38 PM | #13 |
|
Roll Tide
591
Rep 2,345
Posts |
How many hours would you say you have into the rebuild so far? I got a spare N54 with a knock, debating rebuilding vs parting out...
__________________
Fix your broken/stripped cowl bolts with this elegant brass solution!
http://www.e90post.com/forums/showthread.php?p=20230306 |
|
Appreciate
0
|
| 07-27-2016, 09:24 PM | #15 |
|
Brigadier General
 
2203
Rep 3,336
Posts
Drives: X5 & E90 WTCC Widebody Racecar
Join Date: Feb 2013
Location: Chicago West Burbs
|
Curious OP, what spec did you torque the oil pan bolts? And how tough was the busted exhaust mani stud to remove?
|
|
Appreciate
0
|
| 07-28-2016, 12:32 AM | #16 | |||
|
Captain
581
Rep 673
Posts |
Quote:
Quote:
Quote:
|
|||
|
Appreciate
0
|
| 07-28-2016, 12:40 AM | #17 | ||
|
Captain
581
Rep 673
Posts |
Quote:
Quote:
The stud came out pretty easily with the pliers + socket but I was really maximizing the potential of the pliers with my grip, thankfully I didn't have to resort drilling or other more annoying means. Last edited by ucsbwsr; 07-28-2016 at 12:51 AM.. |
||
|
Appreciate
2
Jklad421.00 |
| 07-28-2016, 04:25 PM | #18 | |
|
Colonel

164
Rep 2,875
Posts |
Quote:
__________________
 '08 AW E90 335i PROcede V5 | BMS DCI | RR DPs | ETS FMIC | FORGE DVs | Stett CP | Vanguard | PSS10 |
|
|
Appreciate
0
|
| 07-29-2016, 12:38 AM | #20 | ||
|
Captain
581
Rep 673
Posts |
Quote:
Quote:
Evan |
||
|
Appreciate
0
|
| 07-29-2016, 05:39 AM | #21 | |
|
Banned

654
Rep 946
Posts |
Quote:
|
|
|
Appreciate
0
|
 |
| Bookmarks |
|
|


