

|
|
|
|
|
| 04-13-2009, 03:00 AM | #1 |
|
Private First Class
 
13
Rep 169
Posts |
DIY: Vinyl Roof
EDIT 4/14: I'm going to go back and redo this with fmx's advice sometime soon. It'll be redone with more pictures and a better procedure regarding the fin and the side ski railings. Will keep ya'll posted...
Bought a cutout of semi-gloss black for my roof from Don Nguyen here on the trade section. I love the blacked out roof look on white, especially with the sunroof. Items Needed: Dish soap and water in a spray bottle Vinyl (get it in a size thats larger than your roof, obviously. Don cut out a perfect size for me with plenty to spare). Old credit cards Clean rags Total time: 2-4 hours, and letting it sit overnight. You want to do this with a minimum of at least two people. I ended up doing it with my sister, under the impression as a chick she was good at stuff like this. Now, in retrospect, I wish I had done things differently, and thusly due to the experience I have doing this, I will offer my advice in retrospective terms. It takes about two days to completely finish your vinyl. The 2nd day is for touchups after the vinyl sets. DAY 1 1) Spread out the vinyl over your roof and hold it out on four corners. I scotch-taped it down.   2) Cut a 4'' front to back slit where your antennae fin is and fit it in there and make additional cuts to make it fit. Don't overcut, as you will adjust this later and tuck the excess in under the fin. 3) Cut off any super excess parts from the front, side, back. Leave about 5'' overhang. The more overhang you have, the safer you are. Just, too much becomes a bit annoying to handle.  4) Next, once you got a general size and slit for the fin, you want to peel off the vinyl, from front to back. This is where you could use an extra set of hands. As you pull off the vinyl and bend it back towards the trunk 6'' at a time, you take the spray bottle of soap water and generously spray puffs of soap water onto the bottom of the vinyl (the sticky part). Keeping it moist prevents the vinyl from sticking, but still be careful about the vinyl sticky parts sticking together.  You should end up with this kinda as excess/trash  5) Once you've peeled the vinyl, you and your buddy want to stretch the vinyl down onto your roof, fitting the fin into the slit to minimize the amount of tenting that it'll cause. Stretch it enough so that it matches the curvature of the roof. Generally, stretching will leave stretch marks where your hands were, but thats why you have excess along the sides. Throughout this stretching and roughly fitting process, you want to spray under the vinyl and ontop of the roof so that it remains slippery so you can make adjustments. Also, stretching too hard can cause rips, but its pretty tough to do that. There is excess vinyl around the roof for a reason =D. When you and your partner managed to get as close to a stretched curve to the roof, set it down and tape down the sides (It might be a little tough since it might be wet). I couldn't take any pictures of this process, and I apologize, since this is the most important part. You need to stretch it to fixate around the curve of your roof, otherwise you'll get folding and creasing parts later on from excess vinyl. Definitely do this with two, even four people (one per corner) to get this done right. Doing this perfectly makes the rest a piece of cake. 6) Also missed pictures here. Flatten things out and push out the bubbles with a credit card covered by a towel. Its kind of like using the credit card as a squeegee to remove the air pockets. Cover it with a layer of towel/rag so that the credit card doesn't scratch the vinyl. Do a rough job of it, and adjust the taping/stretching as you see fit. The fin is a tricky part. Do additional cutting as you see fit, so long as you keep to leaving about 1'' of excess that you can tuck under the fin. Don't forget to continue to spray along the edges to allow you to make adjustments... 7) Once you've got a general nice application and tuck, you want to take a brand new razor (new so that it's sharp and won't snag on the vinyl) and cut until there's only 1'' excess around the rims. In order to avoid cutting my paint, I just put an old credit card under the vinyl and eyed the cut onto the credit card. It took a while as each side is like 25 credit cards long lol. Make sure you keep an excess of at least 1'', and at the corners even more to be safe. You should end up with something like this:  This picture shows it being cut too much (Yeah, well second time around I can make it perfect) 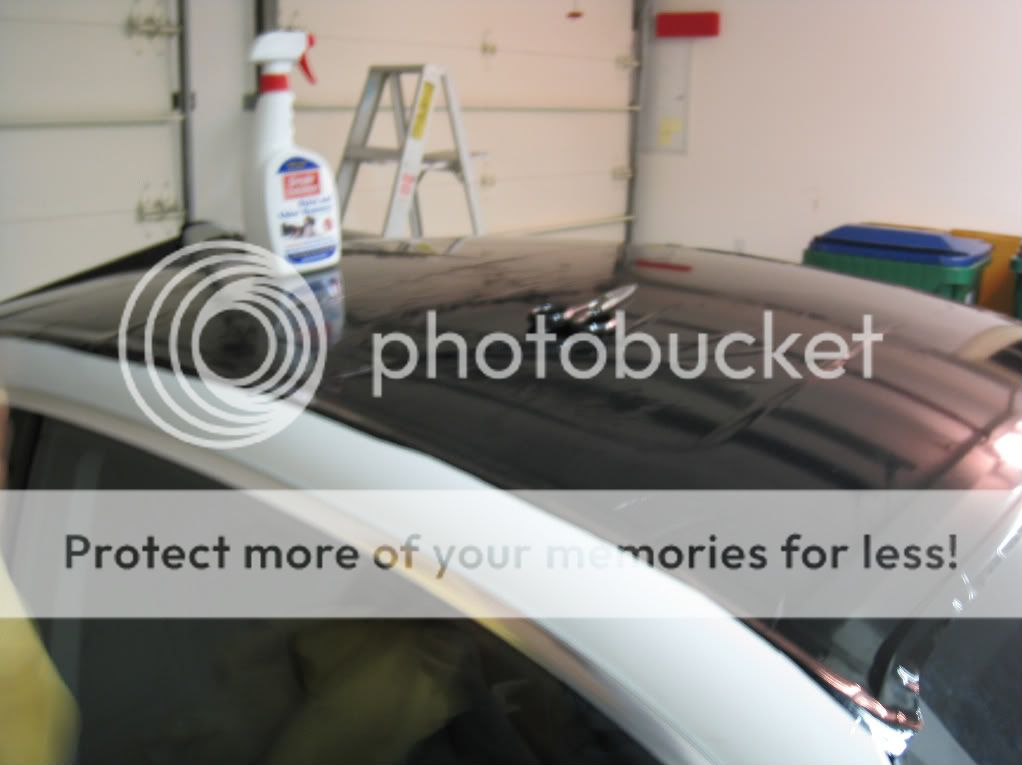 8)Work on the fin now by tucking in the excess with your credit card. Creases and bubbles will form. It's a simple matter of patience and applying pressure to get rid of them. If you didn't stretch the vinyl over enough, you will end up with excess vinyl in the middle that creates one big crease. In that case, I ended up make a small incision and just overlapping. It's hardly noticeable in small cuts like 3''.  9) Cut out the sunroof now. This was kind of tough since you can't slide a credit card under it--at first. What I did was took a razorblade and made a small incision along the indent of where the sunroof around the edges were. From there I cut inwards. You want to leave again about 1'' excess so you would cut a smaller rectangle than what the sunroof forms. After the first incision, use the credit card cutting technique so you don't cut your sunroof. Tuck in with your credit card.  10) Now take a credit card and tuck it in your sides and rear and under the rubber on your front. Cut excess if its too long as too much vinyl will end up sticking out. This is where you want to be SURE you have too much. Cutting and ending up short leaves you a worthless application.  11) Now do the finishing touches by creasing out as much of the bubbles as you can, and set it to dry overnight.    I just left some credit cards into some trouble slots overnight. Also put a brick ontop of a towel ontop of a trouble bubble. Careful about doing that though, for obvious reasons... Go ahead and wait overnight now. Also, I'm aware the spray bottle I'm using is for pet odor and stain removal... It was the only empty spray bottle I had laying around... Last edited by McReary; 04-14-2009 at 05:49 PM.. |
| 04-13-2009, 03:32 AM | #2 |
|
Private First Class
13
Rep 169
Posts |
Day 2
1) Take a look at your trouble bubbles and see if they've gone in or not. Consider reapplying some soap water to places that haven't stuck and apply constant pressure to those areas. Just swiping over with a credit card doesn't work. I found that pushing it down and applying pressure for about 10-20 seconds can solve most of the problems. Just be careful when you drag the card, since stretching and applying pressure can cause rippage... 2) For those stubborn trouble bubbles, take a safety pin and pop a small hole in the center of it. Then flatten it out with your fingers. Should do the trick. 3) This was my first time doing ANYTHING vinyl, let alone on such a tough shape. Second time around, I'd take the advice I placed here and make it pretty near perfect. So, considering this as my first time, I don't find it too bad. In the future, I plan on redoing it to make it look professional, which would be easy for me, now that I know what I'm doing  . Pitfalls are, for example, cutting too short, not stretching to match the curve, the small slit for the fin to make it easier, and toweling the card so it wouldn't scratch the vinyl... . Pitfalls are, for example, cutting too short, not stretching to match the curve, the small slit for the fin to make it easier, and toweling the card so it wouldn't scratch the vinyl...I'm aware of the fin sticking out as white. I've contemplated doing the fin black vinyl too, but oddly I like the little accent the white fin gives. I love how it looks, and know a 2nd attempt would make this look perfect. Sorry I took the pictures so poorly, and I didn't wash the car or the vinyl, so it looks kind of dirty...     Now to finally get some work done next weekend on my H&R sports springs. Then tint and a xenon conversion and I'm done! Oh, and besides the fin, there's also that column/row that goes all the way from front to back along the edges of your roof (It's between your roof and the top of the door. its the columns where the x are in this ghetto diagram ............front.............. |x|.........................|x| |x|......[sunroof].......|x| |x|.........................|x| |x|.........................|x| |x|........[roof].........|x| |x|.........................|x| |x|.........................|x| |x|.........................|x| |x|.........................|x| .............rear.............. Its the column where your ski rack mounts go. I personally just was a bit lazy and vinyled over them and made an indent to show it is there with my credit card. If you were an aspiring vinylist, then you can go ahead and make the cut and tuck them in separately... EDIT: You can pop out these side railings and individually vinyl them. That way, you can tuck in the roof vinyl under the pop-out railing. In this case, you can adjust the roof cuts accordingly so that there's enough to fit under the railing rather than the whole roof including over the railings like I first did. Forgot to mention: The vinyl is completely removable and won't leave a mark on your paint. It'll last at least 2 years up to 5 years. It's a cheap alternative to getting a paintjob! What do you guys think of the fin? My bro came over and said it stuck out too much =[... Last edited by McReary; 04-13-2009 at 04:29 PM.. |
|
Appreciate
0
|
| 04-13-2009, 04:10 AM | #3 |
|
Selling drugs to BMW addicts

17
Rep 468
Posts |
wow, looks good
__________________
---
Quality US Spec Used Cars for Military Members stationed in Europe. Specialized in BMWs and MINIs up to 10k miles. |
|
Appreciate
0
|
| 04-13-2009, 07:44 AM | #4 |
|
Brigadier General
 
279
Rep 3,465
Posts
Drives: 997.2 GT3, '17 G30
Join Date: Apr 2006
Location: NJ
|
Great write-up, thanks for taking the time to detail all that...Even after, I still don't trust myself with a razor blade and my brand new car's paint finish.
__________________
ig: 0verrev
|
|
Appreciate
0
|
| 04-13-2009, 12:23 PM | #5 |
|
Banned
67
Rep 1,334
Posts |
Dude. This thread is awesome. I am glad the vinyl I sold you worked out and everything! You got it on quick.
Let me know if you ever decide you needed/wanted more vinyl to do the antenna. -Don |
|
Appreciate
0
|
| 04-13-2009, 03:12 PM | #6 |
|
Major
 94
Rep 1,245
Posts |
ahhhhh... you made the same mistake i did the first time through... REMOVE THE SHARK FIN !!!!!!
it makes things so much easier trust me hahaha. Not to mention it will come out PERFECT, then while your fin is off, cover that in the same vinyl also so that that it matches exactly. Also, you should have REMOVED those 2 side pieces where the roof rack goes. they pop out really easy so you dont have to waste you time tucking them under that stupid rubber. while those 2 pieces are off cover them separate also. |
|
Appreciate
0
|
| 04-13-2009, 04:22 PM | #8 | |
|
Private First Class
13
Rep 169
Posts |
Quote:
 ? ?If you can fill us in on a small set of instructions to removing the shark fin that would be awesome and I can adjust the diy accordingly! I thought I'd have to deal with polyurethane glue or something so I figured it was going to be a hassle, but I would definitely be interested in redoing the vinyl with no shark fin to hassle with even more this time around Also the side "x" parts from my diagram (I don't know what to call it...) is what you suggested that can pop out? Any set of instructions for that? I think if there's no name for it, we can refer to it as the ski rack railing. If that can pop out easily, I can see how you can tuck the roof vinyl under it, and just separately vinyl the railings and pop them back in. Cool! Thanks for the info and suggestions! |
|
|
Appreciate
0
|
| 04-13-2009, 04:40 PM | #9 |
|
aka 1013MM

1263
Rep 9,545
Posts |
time to black out trim and grills??
__________________
|
|
Appreciate
0
|
| 04-13-2009, 05:32 PM | #11 | |
|
Major
94
Rep 1,245
Posts |
yeah, the polyurethane glue is total bs.. i read that too haha
its stuck on with 3m tape just like the spoiler is basically there is the outer shark fin cover ( which is the part you see) which has 2 prongs in the back of it so dont break it. then there is a smaller fin inside that has electronic components attached to it. get dental floss, or thread and cut around all the 3m tape that you can. they you will be able to get the fin cap off (remember 2 prongs in the back so dont wiggle it too much side to side) once that is off then just use a screw driver to unscrew the smaller fin underneath.. lift it out of the hole in your roof then detach the 3 wires connected to it. tuck the wire back in the big hole and tape it up. then use goo gone to get all the residue off from the roof left behind from the fin Quote:
|
|
|
Appreciate
0
|
| 04-13-2009, 06:40 PM | #12 | ||
|
Private First Class
13
Rep 169
Posts |
Quote:
. I like the chrome. Its kind of my weird taste like for the white fin. Just a drop and xenons and I'll be a happy camper. Also still waiting on Riss Racing to hit me up again for a test fitting volunteer..What I would love to do is create a mini CSL . Just get some CSL replica rims, drop, add some skirts, and find/create a CSL spoiler (man I wish someone made this kind of spoiler--those CF performance ones are cool, but everyone and their grandma has one now ") ). ). Quote:
 . . |
||
|
Appreciate
0
|
| 04-13-2009, 07:45 PM | #13 | |
|
Major
94
Rep 1,245
Posts |
Quote:
i dont have my shark fin on right now actually, just covered with vinyl untill i get some time to do the shark fin with vinyl... now thats tough  |
|
|
Appreciate
0
|
| 04-13-2009, 08:21 PM | #14 | |
|
Private First Class
13
Rep 169
Posts |
Quote:
|
|
|
Appreciate
0
|
| 04-13-2009, 08:37 PM | #16 |
|
Private First Class
13
Rep 169
Posts |
looks slick! Black fin looks nice
Man, the more I look at it, the CF is starting to look nice with the vinyled roof. Also, for the ski rack railing, how do you exactly pop it off? |
|
Appreciate
0
|
| 04-13-2009, 09:46 PM | #17 | |
|
Major
94
Rep 1,245
Posts |
Quote:
|
|
|
Appreciate
0
|
| 08-12-2009, 11:50 PM | #19 |
|
Private First Class
13
Rep 169
Posts |
lol damn did u just get your car? if so congrats? I'm asking, cuz i notice you're everywhere now doin mods here and there!
Down here in socal we have a vinyl vendor, or ppl get it from don, who's posting over at the socal calif section or even on the trade/buy. you can always order it online searching for automotive vinyl or such. if nething, i'd just pm don and see if he'll ship you, since he knows size and cut to give to 1 series. |
|
Appreciate
0
|
| 08-13-2009, 12:03 AM | #20 | |
|
Lieutenant
 
17
Rep 420
Posts
Drives: E36 M3 3.2 (321hp)
Join Date: Mar 2008
Location: Molde
|
[QUOTE]
Quote:
 Agree that it looks good on AW with sunroof! Even better when you fix the shark fin aswell. 
__________________
120d, M-sport, H&R springs,Remus Exhaust, 135I kidneys, 18"BMW performance with Toyo T1R.(summer) 17" style 207 with Michelin Xice(winter), 17" M3 replica with Toyo R888 (Track), Hardwired H/K GPS 810. SOLD! Now driving E36 M3 3.2 (321Hp)
Track and Autox  |
|
|
Appreciate
0
|
| 08-13-2009, 01:14 AM | #21 | |
|
Super Couper
69
Rep 577
Posts |
Quote:
When I was living in Cali last year I was always outside playing with my car, but since moving to the PacNW, I haven't spent much time with it. I'll find Don and see what he suggests. Are there any auto-chains that might sell the vinyl? I'd like to try this tomorrow, can't wait for shipping |
|
|
Appreciate
0
|
Post Reply |
| Bookmarks |
|
|


